
Introduction: Anguished Guardian Guide: Fire, Distance, and Smart Play
Struggling with the Anguished Guardian in Lies of P? You’re not alone. This boss fight is one of the more punishing early encounters in the game, especially if your gear and strategy aren’t tuned just right. But with a bit of planning and the right approach, this towering blue-blood enemy can be taken down cleanly. This guide will walk you through the gear you’ll need, how to prep, the right way to manage both phases, and exactly when to strike for maximum effect.

1. Gear That Makes the Fight Easier
The fight isn’t about brute force — it’s about efficiency and damage-over-time. You don’t need the highest DPS weapon; you need the right mix of fire power, range, and survivability.
Recommended Equipment:
-
Main Weapon: Bone-Cutting Sawblade +10 (or any upgraded melee weapon)
-
Bow Weapon: Royal Horn +5 (heavily used in this fight)
-
Legion Weapon: Flamberg – for fire-based damage at critical phases
-
Grindstone: Fire grindstone (very effective against blue-blood enemies)
Use what you're comfortable with for melee, but prioritize fire-based ranged attacks and distance management.
2. Must-Have Amulets for This Fight
Your amulet setup can impact how smooth the fight goes. You want a balance between durability and boosted damage.
Suggested Loadout:
-
Patience Amulet +1
-
Strength Amulet +1
-
Carrier Amulet +1 – Helps manage gear weight.
-
Kadava Slayer Amulet – Boosts damage against blue-blood enemies. This one is essential.
You don’t need to maximize every stat here, but damage-boosting and survivability-enhancing amulets are the priority.
3. Armor and Defense Tips
Your goal here is physical damage reduction. Most of the Guardian's attacks are physical, so don't worry too much about elemental resistances.
-
Prioritize armor pieces with the highest physical defense stats.
-
Equip Brake Cartridge Loader +1 for extra weight handling.
-
Skip shock resistance gear — not helpful in this fight.
4. Fire is Your Best Friend
Blue-blood enemies in Lies of P are weak to flame. That’s why using Flamberg and a fire grindstone makes a huge difference.
-
Apply fire before engaging.
-
Reapply it whenever you switch back to melee.
-
Flame effects deal bonus stagger and tick damage over time.
Always enter both phases of the fight with fire active — it shortens the fight significantly.
5. Ideal Level for the Fight
The fight can be attempted earlier, but the sweet spot is around level 180.
At level 176, you may find that your hits barely scratch him. It’s doable, but expect a harder time. If you’re under-leveled, try:
-
Redistributing points for more damage.
-
Upgrading weapons before retrying.
6. Opening the Fight: Phase One Prep
As soon as the fight starts:
-
Apply the fire grindstone to your weapon.
-
Sprint toward the Guardian.
Watch his first move:
-
If he jumps and slams down with a red glow, back off and roll to avoid the attack.
-
If he crouches instead, you can safely run to his rear right foot to dodge and begin burning him immediately.
Avoid locking on too early. Manual movement gives you more control during his opening animation.
7. Get the Guardian Burning
Once in close:
-
Land a few solid melee hits while flame is active.
-
Use charged attacks or special moves to ensure burn status is applied.
Once he’s on fire:
-
Back off.
-
Switch to your bow weapon.
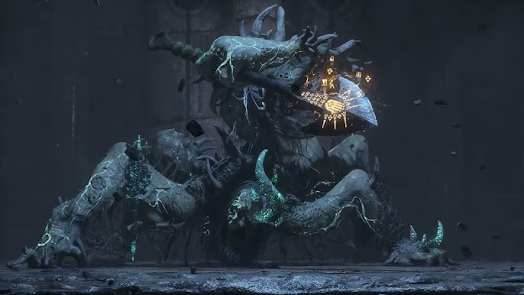
8. Bow Strategy: Targeting the Weak Point
The Guardian's weak point is the small crystal on his right arm. With the Royal Horn bow:
-
Keep your distance.
-
Shoot only when it’s safe — especially during jump animations or when he's winding up.
-
You’re not aiming for damage — you’re aiming for repetition of hits to eventually break the crystal.
If you stay patient and land shots consistently, it will shatter.
9. When to Use Flamberg
Once the arm breaks:
-
Quickly switch to Flamberg.
-
Apply fire again.
-
Rush in and land as many fire-based hits as you can.
This should trigger another burn and deal heavy damage, helping you transition smoothly into the second phase.
10. Second Phase Entry: Immediate Aggression
As the Guardian changes form:
-
Switch back to melee.
-
Run straight at him while he's resetting animations.
This moment is ideal for:
-
Landing 2–3 clean hits.
-
Using any remaining weapon specials.
Once you've done your damage, retreat and resume bow attacks — now aiming for the horn.
11. Bow Focus in Phase Two
In the second phase, your new target is the Guardian’s horn. The process is similar to phase one, but this time:
-
Keep a wide distance.
-
Wait for his charge-up animations.
-
Fire at the horn repeatedly — again, your goal is to break it, not stack direct damage.
He's faster and more aggressive now, so movement and spacing matter even more.
12. Dodging His Red Charge Attack
During this phase, the Guardian frequently uses a red charge attack that can be devastating.
To avoid it:
-
Run straight toward him and dodge forward. This tactic is surprisingly effective.
-
Avoid dodging sideways — it’s riskier with his wide reach.
-
Never stay cornered — always reposition after every few bow shots.
Practicing the forward dodge makes a huge difference in survivability.
13. Breaking the Horn: The Turning Point
Once the horn takes enough hits:
-
It snaps, and the boss is momentarily staggered.
-
This gives you a perfect chance to switch to melee and go in hard.
You can usually land:
-
2–3 fast strikes, then
-
A charged finisher, especially with the Kadava Slayer Amulet active.
This is your biggest damage window of the entire fight.
14. Managing Your Healing Wisely
You’ll only get a handful of healing opportunities in this fight.
To stretch your potions:
-
Always heal only when at safe distance.
-
Never use a potion during a jump animation — wait it out.
-
Watch for calm moments after horn breaks or fire staggers to sneak in a quick heal.
15. The Final Burn
With the horn gone and health low:
-
You can now repeat your previous bow strategy or go fully melee depending on comfort.
-
If fire is ready again, reapply fire and go in.
The last bit of health drops fast if you time your damage bursts correctly and don’t get greedy.
16. Consistency Over Aggression
Don't force damage:
-
Prioritize safe bow hits over risky melee swings.
-
Stick to what worked: distance, dodge, burn, break.
One of the most common reasons for dying late in the fight is pushing for damage too early.
17. Bonus Tips for Faster Success
-
Stay unlocked during large red AOE moves. It makes dodging smoother.
-
Always open with a fire hit — don’t waste time buffing at range.
-
Keep camera distance maxed to avoid losing track of his arms or horn.
18. Troubleshooting Low Damage
If you’re not breaking parts:
-
Check your weapon level.
-
Ensure your amulets are equipped and active.
-
Aim more precisely at the horn or arm, depending on phase.
Even minor misalignment can lead to dozens of wasted arrows.
19. How to Tell You're Close to Winning
There are a few signs:
-
The Guardian becomes more frantic after horn break.
-
He spams fewer charge attacks and more basic swipes.
-
His damage becomes less consistent — a sign he's close to staggering or finishing.
20. The Final Blow and What You Get
As you hit the final sliver of health:
-
Switch to melee.
-
Land one last combo or use a bow special to finish it clean.
Victory Rewards:
-
Tormented Guardian Trophy
-
Potential upgrade mats or crafting items (varies by patch/update)
-
Huge sense of relief.
21. Recap: Core Strategy Breakdown
To summarize everything clearly, here’s the step-by-step strategy:
-
Start with Fire Grindstone Active – Rush in, trigger burn.
-
Switch to Bow – Target the arm crystal.
-
Break the Crystal – Cause stagger, then reapply fire.
-
Use Flamberg – Deal heavy burn damage.
-
Phase Two Begins – Switch to melee, rush underneath for early hits.
-
Retreat and Resume Bow Use – Now aim at the horn.
-
Break the Horn – Watch for stagger, use finisher move.
-
Repeat Fire + Bow Combo – Until his health drops low.
-
Finish with Melee or Bow Special – Depending on positioning and health.
This strategy relies on maintaining space, reading his animation patterns, and focusing fire-based attacks at key phases.
Final Thoughts
The Anguished Guardian is a punishing fight, especially on your first attempts. But using distance, fire weapons, and targeted attacks on weak points will make a noticeable difference. Don’t rush, don’t overcommit — and above all, stay consistent. Once the horn breaks in Phase Two, you're just a few good shots away from a win.
Stick with the strategy above, and the Guardian will go down without too much drama. Good luck!
Conclusion
The Anguished Guardian in Lies of P may look overwhelming at first, but with a solid plan focused on fire damage and ranged pressure, he becomes much more manageable. Equip the right amulets, keep your distance, and prioritize breaking key weak points — the arm in phase one and the horn in phase two. Don’t stress about dealing massive damage quickly. This fight rewards patient, consistent execution. Once you’ve practiced the timing and positioning, taking him down becomes much smoother.
With this guide, you now have a reliable method for defeating one of the game’s most difficult early bosses. Keep your cool, use the bow smartly, and you’ll earn that trophy in no time.

FAQ – Lies of P: Anguished Guardian Boss Fight
Q: What level should I be to fight the Anguished Guardian?
A: Level 180 is ideal. At level 176, the fight is still possible but tougher due to low damage output.
Q: Which weapon works best against the Anguished Guardian?
A: Use any upgraded melee weapon with fire buffs, but the Royal Horn bow and Flamberg Legion weapon are most effective.
Q: How do I avoid the red charge attack?
A: Dodge forward rather than sideways and avoid locking on. Keep moving to prevent getting cornered.
Q: Why is the fire grindstone important in this fight?
A: The boss is weak to fire due to blue-blood traits. Fire causes burn damage and increases stagger potential.
Q: When should I switch from melee to ranged?
A: After applying fire and setting the boss ablaze, back off and switch to your bow for safer, targeted attacks.
Stay Connected with Haplo Gaming Chef
Haplo Gaming Chef blends gaming guides with casual cooking streams for a truly unique viewer experience. Whether you’re here for clean, no-nonsense walkthroughs or just want to chill with some cozy cooking content between game sessions, this is the place for you. From full game unlock guides to live recipe prep and casual chats, Haplo Gaming Chef delivers content that’s both informative and enjoyable.
You Can Follow Along On Every Major Platform:
YouTube, Twitch, TikTok, Instagram, Twitter/X, Threads, Bluesky, Pinterest, Flipboard, Facebook, LinkedIn, Tumblr, Medium, Blogger, and even on Google Business.
No filler, no fluff—just straight-up help for gamers and fun for foodies. Join the community today!


No comments:
Post a Comment