
Exploring the vast, dangerous world of Dune: Awakening brings many challenges, but one of the trickiest is the Final Test. This area isn't just hidden away; it’s packed with multiple layers of puzzles and obstacles that require both strategy and awareness. Whether you're hunting for gear, story progression, or just looking to clear this final stretch, this walkthrough will show you exactly where to find the Final Test, how to solve each puzzle, and what to expect from the final battle.
In this detailed guide, you'll get:
-
The exact location of the Final Test on the map.
-
Step-by-step puzzle solutions with button sequences.
-
How to avoid missing loot in blocked-off areas.
-
Tips to prepare for the final fight.
Let’s break it down from the beginning so you don’t miss anything important.

How to Find the Final Test in Dune: Awakening
To get started, make your way to the border between the Eastern Shield Wall and Myel. You’re looking for a large crevice along the cliffside — it might not seem like much at first, but that’s your entry point. This marks the start of the Final Test sequence. The path here isn’t marked clearly on the map, so keep your eyes peeled for a deep-cut area in the rock formations.
Once you enter, you’ll encounter your first challenge, a locked stone door. To get it open, you’ll need to answer a series of questions correctly. The answers are visible on-screen during this part, but you’ll need to input them in the right order. Once all answers are correct, the door will slide open, revealing the deeper part of the test area.
Navigating the Blocked Passage and Clearing the Area
After passing through the door, you’ll explore a bit before hitting a blocked passage filled with boulders. Here, you’ll need to use your cuttery (a standard in-game tool) to break through. You have two options: clear every boulder to collect all hidden items in the area, or take a faster route — go straight ahead, turn right, then left at the next turn to find the staircase.
This blocked-off section isn’t just filler — there are useful items hidden among the rubble. So, if you have time and resources, it’s worth clearing out the area. Just be sure to watch your health and equipment durability if you’re under-equipped.
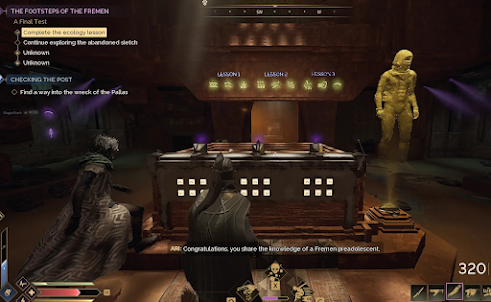
Symbol Puzzle and the Hidden Lesson
Once you ascend the stairs, you’ll find yourself in a room centered around a stone table with multiple buttons. This is the symbol puzzle, and it’s tied directly to a short audio lesson that plays when you arrive. Your task is to listen carefully to the lesson and arrange the symbols on the table in a way that matches what you've learned.
To change the symbols, simply interact with the buttons located on the front side of the table. Each button cycles through different symbols. Your objective is to stop on the correct sequence. The game does not penalize you for wrong choices, so take your time and match the pattern described in the lesson. If you’re stuck, watch for subtle clues in the audio.
How to Solve the Ring Puzzle in the Final Test
After completing the symbol table challenge, the next room presents the final puzzle before the combat sequence — the ring alignment puzzle. The structure consists of three rotating rings, each of which must align to form a full image. You’ll need to work from the inside out:
-
Start with the innermost ring, lining it up to match the carved grooves.
-
Then, rotate the middle ring to continue the pattern.
-
Finally, align the outer ring to complete the design.
Once the image is fully formed, the altar will activate, allowing you to proceed. Be sure to double-check your alignment before confirming — a slight misplacement can prevent activation.
Activating the Altar and What Comes Next
With the rings aligned and the image complete, interact with the altar to trigger the next sequence. This action opens up the final path and initiates the last series of events in the Final Test. There’s no more puzzle-solving from this point on — it’s all about readiness. Before moving forward, check your inventory: make sure your gear is in good condition and that you’ve stocked up on health items or buffs.
What follows is a combat-heavy segment. The enemies in this area are stronger than average, and if you’re not adequately equipped, the fight can be overwhelming. They spawn in waves, and you’ll need to stay mobile and watch your surroundings closely. Using area control tools or crowd management abilities can make this part a lot easier.

Final Fight Tips and Completion Rewards
The final fight includes multiple waves of enemies that grow tougher as the battle progresses. These enemies are not just aggressive — they’re built to test everything you’ve learned so far. Stay close to cover and avoid getting surrounded. If you're playing solo, it might be worth adjusting your gear to focus on sustain and crowd control.
Once you defeat the final wave, you’ll unlock the completion rewards and trigger a short cinematic that wraps up the test. Be sure to check your surroundings before exiting — some loot containers only appear after the final battle ends. When you're done, return to the starting point to complete the Final Test segment officially.
Conclusion: Mastering the Final Test in Dune: Awakening
The Final Test in Dune: Awakening is more than just another in-game checkpoint — it’s a layered experience combining exploration, puzzles, and combat. From locating the hidden entrance along the Eastern Shield Wall to solving symbol and ring-based puzzles, every step challenges your understanding of the game's mechanics. Being prepared, both mentally and with the right gear, is essential.
Take your time with the puzzles, don’t rush the exploration, and make sure you’re combat-ready before triggering the final sequence. If done right, this part of the game is not just rewarding in terms of loot, but also satisfying from a gameplay perspective. Good luck, and see you in the next mission!
FAQs – Dune: Awakening Final Test
Q1: Where is the Final Test located in Dune: Awakening?
A: It’s found at the border between the Eastern Shield Wall and Myel, inside a cliffside crevice.
Q2: How do I open the first locked door?
A: You need to answer the on-screen questions correctly in the displayed order to unlock the door.
Q3: What tool do I need to clear the boulders?
A: Use the cuttery to destroy boulders and access hidden items or alternate paths.
Q4: How do I solve the symbol puzzle?
A: Listen to the lesson, then match the symbols on the stone table using the buttons in front.
Q5: How does the ring puzzle work?
A: Align the inner ring first, then the middle, and finally the outer ring to form a complete image.
Q6: Is the final battle difficult?
A: Yes. It's recommended to be well-equipped and bring plenty of healing items to survive multiple waves of enemies.
🎮 Meet Haplo Gaming Chef 🍳
Level 99 Kitchen Warrior here! I'm on a quest to transform your gaming sessions into epic culinary adventures. When I'm not farming rare ingredients in MMOs, I'm crafting real-world recipes inspired by your favorite video games.
Specializing in: • Game-inspired recipe creation • Cooking quest guides • Power-up snacks for gaming sessions • Achievement-worthy meal prep
Join my party as we explore the delicious intersection of pixels and plates. Whether you're a casual foodie or a hardcore gamer, there's always room at my crafting table! #Gaming #GamingGuides #GamingChef #HaploGamingChef For More Visit: https://haplogamingchef.blogspot.com/
Follow Me!
https://bsky.app/profile/haplogamingchef.bsky.social
https://www.threads.com/@haplogamingchef
https://www.twitch.tv/haplogamingchef
https://www.pinterest.com/haplogamingchef
https://www.youtube.com/@HaploGamingChef
https://www.tiktok.com/@haplogamingchef
https://flipboard.com/@HaploGamingChef
https://x.com/HaploGamingChef
https://www.instagram.com/haplogamingchef
https://www.facebook.com/HaploGamingChef
https://www.linkedin.com/in/haplogamingchef
https://haplogamingchef.blogspot.com
https://www.tumblr.com/haplogamingchef
https://medium.com/@haplogamingchef
Google Business Profile: https://g.co/kgs/SLVFpRa


No comments:
Post a Comment