In Death Stranding 2, one of the coolest mechanics you can unlock is the EX Capture Grenade. This special grenade allows you to catch BTs, or "Beached Things," and then summon them to fight alongside you as allies. These captured BTs serve as powerful tanks—drawing attacks from other BTs and soaking up damage for you, which is a game-changer.
How to Get the EX Capture Grenade
You can obtain the EX Capture Grenade by connecting to the Meta Genomicist during your progress in the main storyline. There's no special mission required—it's unlocked naturally as you advance. Specifically, you'll need to deliver timefall-resistant ammo to the Meta Genomicist in the Meta Genomicist location (which I’ll share on the map below). Once you've reached this stage, you'll unlock the EX Capture Grenade.
Once you’ve unlocked this area and connected it to the Chiral Network, you’ll automatically gain access to the EX Capture Grenade. At this point, you’ll be able to catch and summon large BTs.
Using the EX Capture Grenade in Battle
Now that you’ve got the EX Capture Grenade, it's time to learn how to use it effectively in combat. To capture a BT, you’ll need to weaken it first. Damage the BT until it becomes stunned, which is when it opens its mouth. The timing here is key, and you’ll see a visual cue—everything will turn yellow, signaling that you’re in the right window to use the grenade. Here’s a breakdown:
Weaken the BT: Use any of your weapons to damage the BT, but don’t kill it yet.
Wait for the stun: Once the BT stuns and its mouth opens, you’ll see the yellow cue.
Throw the EX Capture Grenade: Now, throw the grenade to capture it. The moment you throw it, you’ll see a crystal form around the BT.
Collect the White Car Crystals: After capturing the BT, you’ll need to grab the white car crystals that drop. Don’t miss this step!
Make sure you have multiple grenades on hand because, as you’ll see in the video, it may take a couple of tries to get the timing right. The EX Capture Grenades are reusable, but you’ll need to collect more Chiral Crystals if you want to spawn the BTs again.
Summoning Your Captured BTs
Once you’ve captured a BT, you can summon it to fight for you. This is where the EX Capture Grenade really shines.
Open your Item Menu: Press the right D-pad to bring up the item menu.
Summon the BT: When the crystal around your captured BT glows, press X to summon it into the battlefield. You’ll now have a powerful ally helping you fight other enemies.
There’s a noticeable difference between a captured BT and enemy BTs. Captured BTs will glow blue, while the enemy ones will glow yellow, making it easy to distinguish them. Keep in mind, these summoned BTs have health and can die if they take too much damage.
Managing Your Summoned BTs
Once summoned, your BT will fight alongside you. However, be aware that your BT can die. If you summon one, make sure to keep an eye on it. If it falls, you’ll need to eliminate the remaining enemies yourself.
For example, in one of my battles, I had a summoned BT that took massive damage and eventually died. Even though it was gone, I was still able to finish off the remaining enemies with ease, thanks to the support it provided earlier.
Unlocking the Full Potential of the EX Capture Grenade
The EX Capture Grenade is not just a tool for summoning BTs; it’s a game-changing mechanic that adds another layer of strategy to Death Stranding 2. With this grenade, you're essentially turning the tide of battle in your favor by utilizing the power of your enemies. But to get the most out of it, you’ll need to know a few tips to maximize its effectiveness.
1. Managing Multiple BTs
Once you’ve captured one BT, you might be wondering if you can summon more than one at a time. Yes, you can! However, it’s important to note that while multiple summoned BTs can help you take on enemies, they will cost you more Chiral Crystals to summon. Keep an eye on your available resources before you summon a bunch of them in a single fight.
When summoning multiple BTs, make sure to use them strategically. You don’t want to overwhelm yourself with too many BTs, especially when their health can be easily depleted. Sometimes it’s better to summon just one powerful BT and save the others for later. Spacing out your summons and using them as needed will make a huge difference, especially in longer battles.
2. Saving Your EX Capture Grenades
The EX Capture Grenades can be a bit scarce if you’re not careful, and if you use them all too quickly, you may find yourself out of stock when you need them most. Make sure to conserve your grenades and only use them when you know you’ll be able to get a BT. Try to target larger BTs for your captures since they offer more strategic value in fights. These tougher BTs will be more tanky and can take the brunt of enemy attacks, giving you time to deal damage or regroup.
Also, remember that Chiral Crystals are the resource required to summon your captured BTs. You’ll need a steady supply, so keep collecting these crystals throughout your journey. There are many ways to farm them—whether it’s by completing orders, exploring the world, or dealing with enemies, Chiral Crystals are a must-have for frequent summons.
3. Timing Is Everything
The timing of your capture can be tricky. As mentioned earlier, the BT needs to be stunned before you can capture it. But there’s another key aspect: you need to be quick. The moment a BT’s mouth opens, you’ve got only a small window of time to launch your grenade. If you miss the timing, you’ll have to start the process over again.
Additionally, it’s crucial to know when not to engage a BT. Sometimes, it’s better to wait for the right moment rather than rushing in. BTs can be unpredictable, so try to observe their behavior before you make a move. For example, if you’re surrounded by multiple BTs, consider drawing one away from the group before attempting to capture it. This will reduce the risk of other BTs interfering and complicating the capture.
4. Synergy with Other Tools and Weapons
The EX Capture Grenade works best in synergy with your other tools. For instance, if you’re going into an area with multiple BTs, you might want to use a Non-Lethal Weapon (like the stun grenades) to weaken them first, then follow up with the EX Capture Grenade. Alternatively, you could use timefall-resistant ammo to slow them down or the Bola Gun to immobilize them temporarily, making it easier to capture them.
Don’t forget about your BB (Bridge Baby). While it’s not directly related to the EX Capture Grenade, your BB will provide important alerts when there are nearby BTs. Pay attention to the signs your BB gives off to help you identify where the BTs are lurking. This way, you can approach with more awareness and reduce the chances of missing the right opportunity for a capture.
Strategic Applications of the EX Capture Grenade in Missions
The EX Capture Grenade is not just a tool for fighting BTs. It has a lot of strategic applications in certain missions that require stealth or managing difficult environments. In some cases, you may be tasked with delivery missions where you need to carry fragile cargo through BT-infested areas. Instead of risking the destruction of your cargo or getting overwhelmed by multiple BTs, you can use your captured BTs as decoys, allowing them to take the attention while you safely transport your cargo.
1. Use Captured BTs to Draw Attention
When you’re on a mission that takes you through hostile territory, you can use a summoned BT to draw the attention of enemies. The summoned BTs can distract the other BTs, giving you a chance to sneak through without triggering a fight. This can be particularly useful if you’re trying to get past a large cluster of BTs without engaging in battle. Simply summon a BT, let it tank the attacks, and then quietly move forward.
2. Time for Teamwork: Combining Your BT with Allies
In certain missions, you’ll need to work with NPCs, and the EX Capture Grenade can also be used as a team tool. Having an ally help you set up the battlefield while you focus on capturing BTs can make a huge difference. In fact, once you’ve captured multiple BTs, you might even want to assign different summoned BTs to different parts of the battlefield—one for offense and the other for defense.
Conclusion: Make the Most of Your EX Capture Grenade
The EX Capture Grenade in Death Stranding 2 is a versatile tool that adds a layer of complexity and fun to the game. Whether you’re using it to fight BTs, assist with deliveries, or turn the tide in tough battles, mastering its use is crucial for a successful adventure.
Make sure you keep your resources in check, timing is on point, and strategize effectively with the different BTs you summon. It’s not just about capturing BTs—it’s about understanding how to use them to your advantage in a variety of scenarios. So, keep experimenting and exploring this mechanic, and soon you’ll be a pro at summoning BT allies!
Remember, the power of the EX Capture Grenade is in your hands. Now go out there and take control of the battlefield!
FAQ for EX Capture Grenade in Death Stranding 2
1. What is the EX Capture Grenade?
The EX Capture Grenade is an item in Death Stranding 2 that allows you to capture BTs and summon them as allies in battle.
2. How do I get the EX Capture Grenade?
You unlock the EX Capture Grenade by connecting to the Meta Genomicist during the main story, after completing a specific delivery mission.
3. How do I capture a BT with the EX Capture Grenade?
To capture a BT, weaken it until it becomes stunned, then throw the grenade when its mouth opens, and collect the white car crystals after the capture.
4. Can I summon multiple BTs at once?
Yes, you can summon multiple BTs, but each requires Chiral Crystals. Summon strategically to avoid running out of resources.
5. Can captured BTs die?
Yes, captured BTs have health and can die if they take too much damage. Be sure to manage their health during battles.
6. How do I summon a captured BT?
Open the item menu, select your captured BT, and press X when the crystal glows to summon it into the fight.
7. Are EX Capture Grenades reusable?
Yes, the EX Capture Grenades are reusable as long as you have enough Chiral Crystals to summon your captured BTs.
Stay Connected with Haplo Gaming Chef
Haplo Gaming Chef blends gaming guides with casual cooking streams for a truly unique viewer experience. Whether you’re here for clean, no-nonsense walkthroughs or just want to chill with some cozy cooking content between game sessions, this is the place for you. From full game unlock guides to live recipe prep and casual chats, Haplo Gaming Chef delivers content that’s both informative and enjoyable.
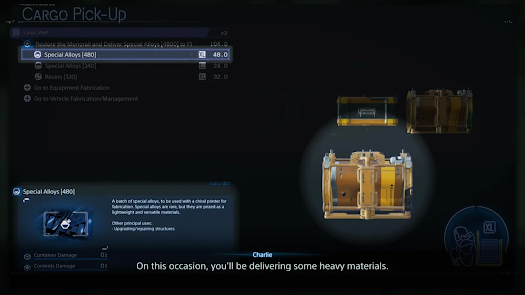
Introduction: Complete Order No. 13 - Restore the Monorail and Deliver Alloys
In Death Stranding 2, Order No. 13 presents a challenging but rewarding task for players. You’re asked to restore a monorail system, deliver crucial materials, and extend the network of connections across the world. This detailed walkthrough will guide you step by step on how to efficiently complete this order and help you understand the importance of each task, including the restoration of F1’s monorail and the delivery of special alloys.
Key Objectives of Order No. 13
Before jumping into the specifics, let’s outline the essential objectives for Order No. 13:
Restore the mine north of F1 and bring the monorail station back online.
Deliver special alloys to F1 using the restored monorail.
Extend the network by completing the task and bringing new supplies to the West Fort Nod.
You’ll need to complete these objectives in sequence, and there are a few different ways to approach each part. Let’s break it all down.
Step 1: Preparation Before Heading to F1
Pick Up Materials from the Delivery Terminal
Your first stop should be the DHV Mellan’s Delivery Terminal. Here, you’ll find the materials necessary for restoring the mine north of F1. You’ll want to load these onto your carrier or vehicle of choice. This is a critical part of your journey as the materials are what you’ll use to start the restoration process once you arrive at the mine.
Map Out Your Route to the Mine
The mine is located to the north of F1, so you’ll want to plan your route carefully. Make sure to check the map and identify any hazards like difficult terrain or BT areas. Depending on your preference, you can choose to take a Tri Cruiser or use floating carriers to transport the materials. The floating carriers, especially, will make your job easier by allowing you to glide over challenging terrains.
Step 2: Restoring the Mine and Monorail Station
Arriving at the Mine
Once you’ve reached the mine north of F1, head to the terminal at the site. You’ll need to submit the materials you’ve brought to get the facility back online. This will involve interacting with the terminal to begin the restoration process.
Mining Operations
Once the mine is functional again, it’s time to extract materials. The terminal will prompt you to start mining operations. When successful, you’ll extract a large quantity of materials, which you will then need to transport back to West Fort Nod. You’ll want to make sure everything is packed and ready for delivery once you’ve finished at the mine.
Using the Monorail for Transport
Now that the Monorail is operational, it’s time to make use of it. This is the easiest way to transport large quantities of materials across long distances. Simply load the extracted materials onto the Monorail at the mine and send them off towards F1.
Step 3: Delivering the Materials to West Fort Nod
Setting up the Delivery
When the materials arrive at F1, you’ll need to submit them at the delivery terminal. This part of the mission is about completing the cycle—taking what you’ve mined and getting it to its final destination.
The Benefits of Using the Monorail
With the Monorail now fully operational, you can easily ship these materials to West Fort Nod without much additional effort. This method saves you a lot of time compared to transporting the materials manually, especially with the terrain and constant threat of BTs.
Step 4: Completing the Mission and Receiving Rewards
Once you’ve successfully delivered the materials to West Fort Nod, the mission is complete. The community there will have the supplies they need to prepare cargo for future deliveries, meaning that you’ve helped expand the network and ensure the continued survival of the settlements.
Rewards
Increased Material Withdrawals: Now that the Monorail is restored, you’ll have access to a larger quantity of materials from F1, which will make future missions smoother.
New Vehicle: As a reward for your efforts, you’ll unlock the Pick-Up Off-Roader, a large four-wheel drive vehicle capable of carrying significant cargo across rough terrain. This vehicle is customizable and can be adapted to your play style, making it an essential tool for the upcoming orders.
Special Collectibles: As a token of appreciation, you’ll also receive some rare collectibles that will enhance your gear.
Step 5: The Importance of This Mission in the Larger Story
While completing this order may seem like just another logistical task in Death Stranding 2, it plays a significant role in the broader narrative and your ongoing journey. By restoring the Monorail and extending the network, you’re helping to build a connected world that can stand against the chaos caused by Higgs and the other antagonists.
The Emotional Journey
This order also ties into the emotional arc of Fragile, who is still haunted by the events of the past. She’s trying to suppress her emotions and stay strong to help you complete your mission. As you work through the game, it becomes clear that you’re not just rebuilding infrastructure; you’re also helping each character deal with their trauma and pain.
Conclusion: The Road Ahead
Completing Order No. 13 will feel like a huge accomplishment. You’ll have restored the Monorail, delivered the alloys, and helped to expand the network. But more importantly, you’ll have gained new insights into the world around you and the characters you’re helping. The journey is far from over, and every step you take brings you closer to completing the world’s network and uncovering more about Lou and the mysteries of the game.
Keep your eyes peeled for the next orders, and remember to take care of yourself as you continue your journey through the world of Death Stranding 2.
FAQ for Death Stranding 2: Order No. 13 Walkthrough
1. What is Order No. 13 in Death Stranding 2?
Order No. 13 requires players to restore the monorail station near F1 and deliver materials to West Fort Nod. It’s key for expanding the network and progressing through the game.
2. How do I restore the Monorail in Death Stranding 2?
To restore the Monorail, head to the mine north of F1, submit materials at the terminal to reactivate the facility, then use the Monorail to transport mined resources.
3. What should I use to transport materials in Order No. 13?
You can use a Tri Cruiser or floating carriers. Floating carriers are particularly useful for heavy cargo and difficult terrain, but remember they need Chiral Crystals to function.
4. Where can I get materials for the Monorail restoration?
Materials for the restoration can be found at the DHV Mellan Delivery Terminal. Once you collect these, head to the mine north of F1 to restore the monorail.
5. What rewards do I get after completing Order No. 13?
You’ll unlock new vehicles like the Pick-Up Off-Roader and gain access to larger material withdrawals from F1. You’ll also receive special collectibles.
Stay Connected with Haplo Gaming Chef
Haplo Gaming Chef blends gaming guides with casual cooking streams for a truly unique viewer experience. Whether you’re here for clean, no-nonsense walkthroughs or just want to chill with some cozy cooking content between game sessions, this is the place for you. From full game unlock guides to live recipe prep and casual chats, Haplo Gaming Chef delivers content that’s both informative and enjoyable.
In Death Stranding 2, summoning large BTs to fight for you is one of the most exciting mechanics you’ll encounter. If you're curious about how to harness this power and use it to your advantage, you're in the right place. This guide will walk you through the process of summoning these powerful creatures, detailing the steps and important tips to ensure your success in these epic battles.
Step 1: Unlocking the Summoning Ability
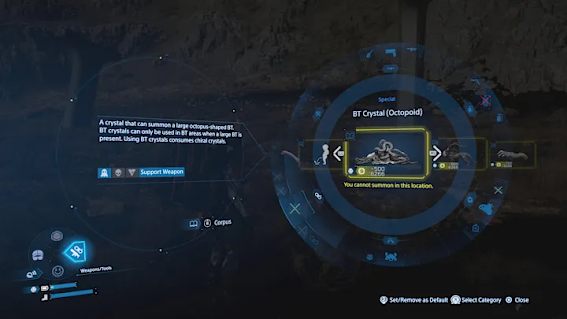
To start summoning large BTs, you’ll need to progress through Chapter 1, completing Order Number 3 or Order Number 4. This will introduce you to the X Grenade, which is the key item required for the summoning process.
Once you have the X Grenade, make sure you're prepared to face larger BTs. These aren’t the small, everyday enemies that you encounter throughout the world. You’ll specifically need the larger BTs, which are characterized by their enormous size and distinctive features—namely their mouths.
Step 2: Targeting the Right BTs
To summon a BT to fight for you, it must be one of the larger ones. These large BTs have mouths that serve as the target for your X Grenade. Simply throwing the grenade at the BT won’t be enough; you must aim directly at the mouth for the summoning to work.
In some cases, you'll have a better shot at hitting the BT’s mouth when it’s temporarily idle. For instance, during combat, the BT may fall over or pause for a brief moment (around 10–15 seconds). This is your chance to throw the grenade accurately.
Take a look at the following clip to see how I missed my first attempt but succeeded the second time. When you land the shot, you’ll earn the Best Friend Trophy, a nice little bonus for your efforts.
Step 3: Defeating the BT and Collecting the Reward
After successfully summoning a BT to fight for you, you must defeat it, just like you would any other BT. Once the BT is defeated, make sure to collect the white crystals that are scattered around the battlefield. These crystals are vital for progressing in your ability to summon BTs.
One particular item to look for among the collected crystals is the golden one. This substance is a key component needed for summoning the large BTs. Without it, your effort will have been in vain, as it’s the substance that powers the summoning process.
So far, I've only encountered one BT that drops this golden substance, but it’s likely that more will appear as you progress further in the game. You may be able to summon other large BTs once you have this item.
Step 4: Using the Summon Effectively
Once you’ve collected the golden substance, you can summon large BTs during specific battles. However, there are restrictions to keep in mind:
You cannot summon large BTs to fight against regular enemies. Summoning can only occur in specific, larger battles—typically against other large BTs or major bosses.
Summons are limited to certain areas. You won’t be able to summon a BT to fight for you in every part of the game. You must be in the right context, such as a major boss fight or when facing similarly sized BTs.
Step 5: What to Expect During Summoning Battles
When you finally summon a large BT, you’ll witness a powerful battle between your summoned ally and the enemies you’re facing. The summoned BT will fight alongside you, making the battle feel like a true spectacle.
In a recent battle, I was able to summon a BT against a formidable boss, and the fight was absolutely thrilling. The summon fought with incredible strength, and it was awe-inspiring to see such a large creature take down the massive enemies that I was struggling against.
Bonus Tips for Summoning BTs
Timing is Everything: Make sure you’re prepared to act when the BT is momentarily vulnerable. You only have a few seconds to land your shot, so be quick.
Don’t Forget to Collect the Golden Substance: If you miss out on this crucial item, you won’t be able to summon other BTs. Be sure to pick it up before moving on.
Strategize Your Battles: Don’t waste your summons on small enemies. Hold off until you’re facing larger threats or boss-level challenges where a summoned BT can make a real difference.
Conclusion
Summoning large BTs to fight for you in Death Stranding 2 can turn the tide in some of the game’s toughest battles. By following the steps outlined in this guide, you’ll be able to harness the power of these monstrous creatures and use them to your advantage. Remember to aim for the right targets, collect the necessary substances, and only summon in appropriate scenarios.
I hope you found this guide helpful! As you continue your journey through Death Stranding 2, I’m sure you’ll discover even more ways to use these powerful summons strategically. If you have any questions or need more tips, feel free to drop a comment. I'm always happy to help!
Stay Connected
If you’re enjoying the game as much as I am, don’t forget to subscribe for more tips and guides. Thanks for watching, and I’ll catch you in the next one!
FAQ
1. How do I summon large BTs in Death Stranding 2?
To summon large BTs, you need the X Grenade and must target their mouths. You can only do this on larger BTs during certain battles.
2. When can I summon BTs?
You can summon BTs only in specific boss fights or when fighting other large BTs. Summoning doesn’t work for smaller enemies.
3. What do I need to summon BTs?
After defeating a large BT, collect golden crystals. These are necessary for summoning. Without them, you won’t be able to summon BTs.
4. Can I summon BTs in any area?
No, summoning is restricted to certain areas, usually large-scale battles. You can’t summon BTs in just any part of the game.
5. How can I make sure the summoning works?
Ensure you hit the BT’s mouth with the grenade when it’s vulnerable, typically when it falls or pauses in battle. Timing is key.
Stay Connected with Haplo Gaming Chef
Haplo Gaming Chef blends gaming guides with casual cooking streams for a truly unique viewer experience. Whether you’re here for clean, no-nonsense walkthroughs or just want to chill with some cozy cooking content between game sessions, this is the place for you. From full game unlock guides to live recipe prep and casual chats, Haplo Gaming Chef delivers content that’s both informative and enjoyable.
Introduction: Delivering Terraforming Equipment to Rainbow Valley
In Death Stranding 2, your journey is filled with various missions that challenge your navigation and delivery skills. One of the critical missions involves delivering terraform equipment to Rainbow Valley, a pivotal location for the ongoing terraforming efforts in the game's storyline. This task, listed as Order No. 14, will require you to traverse treacherous terrain, use specific equipment, and establish a connection that brings the region one step closer to recovery. This guide provides detailed insights into how you can successfully complete the mission and contribute to the game's ongoing environmental restoration.
Preparing for the Journey
Before heading out to deliver the terraforming equipment, it’s crucial to understand the mission’s scope and the necessary steps for a successful delivery. Sam will be heading towards Rainbow Valley, where a significant environmental project is underway. Your first task is to gather the terraform equipment from the delivery terminal and ensure it’s in optimal condition for the journey. This equipment will be essential in stabilizing the environment and helping the region recover from the devastation caused by the desertification process.
Key Objectives:
Pick up the equipment at the delivery terminal.
Head towards Rainbow Valley, passing through challenging terrain.
Link up the site to the broader UCA network for full coverage.
Navigating the Terrain to Rainbow Valley
Rainbow Valley is not a simple destination, and getting there involves navigating a complex landscape. Your route will take you through canyons and potentially hazardous areas, so be prepared for challenging environmental conditions. Along the way, you will encounter cliffs, rough paths, and, of course, the potential dangers that come with the region’s unpredictable weather and geography.
Here are a few tips for navigating through this environment:
Use Vehicles When Possible: If you’ve unlocked any vehicles, make sure to use them to cover longer distances more efficiently. The terrain can be rough, so keeping your vehicle in good condition is essential.
Monitor Weather Conditions: Always be aware of changing weather patterns that can affect your mobility. Rain and extreme winds can slow you down, and harsh conditions might even lead to BT (Beached Thing) encounters.
Route Planning: Before heading out, plan your route to avoid the most dangerous areas. The game’s map is helpful in highlighting safe paths and avoiding potential ambush points.
Delivering Terraforming Equipment and Connecting to the Network
Once you reach Rainbow Valley, you will be met with another challenge: connecting the site to the larger network. The UCA (United Cities of America) network expansion is crucial for restoring environmental balance and boosting communication across the region.
You’ll meet a familiar face here, Drawbridge, who will assist with the setup. However, your first priority is to deliver the terraform equipment. Here's how to do it:
Deliver the Terraforming Equipment: Ensure all cargo is properly secured and transported. This equipment is crucial for the terraforming project, so any damage to it could delay progress.
Connect the Site: Upon successful delivery, you will be tasked with linking the site to the UCA network. This involves setting up a Cupid device, which will allow Rainbow Valley to communicate with other connected sites and further the terraforming efforts.
By completing these steps, you’re helping to restore the environment and build a foundation for future growth in the region.
The Role of Tar Cannons in Terraforming
During your journey, you’ll also be introduced to a unique piece of equipment: the Tar Cannon. This device plays a vital role in combating forest fires, which are a common occurrence in the region.
The Tar Cannon works by extracting tar from the earth and using it to extinguish flames. Its design leverages the viscous properties of tar, making it a highly effective tool for managing wildfires while conserving precious water resources. Here’s a breakdown of the Tar Cannon’s functionality:
Extract and Discharge Tar: The cannon allows you to extract tar from the environment and discharge it as a fire extinguisher.
Portable Use: While you can carry the cannon, it cannot be refueled while in motion. This means you need to be strategic when using it during a wildfire.
Survival Tip: If you encounter a wildfire, you’ll need to carefully choose when to fight the fire and when to retreat. It’s a balance of using the Tar Cannon effectively while avoiding being overwhelmed by the blaze.
By using the Tar Cannon, Sam can help prevent more of the region from succumbing to the desertification process.
Environmental Restoration: The Long Road Ahead
Rainbow Valley, once a lush and thriving environment, has suffered greatly due to the relentless spread of desertification. The area’s ecosystem was once home to abundant flora and fauna, but now, it’s a desolate landscape. The mission at hand is not just about delivering equipment; it’s about contributing to the long-term restoration of the environment.
Here’s a quick overview of the key points you should keep in mind about the region’s history and the restoration efforts:
Desertification: The region has experienced a rapid decline in vegetation, which led to the abandonment of nearby towns. These towns were once thriving communities but now lie in ruins.
Terraforming Initiatives: The introduction of terraforming equipment is the first step in reversing the damage done. It’s a long and difficult process, but with continued efforts, the region may eventually return to its former state.
The Role of the Apac People: With the help of the Apac people, some progress has been made. However, the true challenge lies in maintaining and nurturing the fragile ecosystems that remain.
Wrapping Up the Mission: The Road to Future Restoration
With the delivery of the terraform equipment and the successful connection to the network, you’ve made significant progress in the restoration of Rainbow Valley. However, this is just one step in a much larger effort. The environmental projects in Death Stranding 2 are ongoing, and your contributions are vital to the success of the greater mission.
Before leaving the area, be sure to check in with your comrades and ensure all tasks are completed. You'll find them near the ravine on the other side of the river, awaiting your next steps. The collaborative efforts of Sam, Drawbridge, and the local team are a testament to how teamwork can overcome the harshest of conditions.
As you move forward, remember that this is not just about completing deliveries—it's about contributing to a cause that will take time, patience, and dedication to see through to the end.
Conclusion
Order No. 14, which involves delivering terraform equipment to Rainbow Valley, is a crucial mission in Death Stranding 2. Through careful navigation, strategic use of tools like the Tar Cannon, and fostering connections in the UCA network, you are actively participating in restoring the environment. While the road ahead is long and full of challenges, your efforts bring the region closer to recovery.
H3: FAQ - Frequently Asked Questions
1. What is Order No. 14 in Death Stranding 2?
Order No. 14 requires Sam to deliver terraform equipment to Rainbow Valley, helping restore the environment by linking the area to the UCA network.
2. How do I use the Tar Cannon in Death Stranding 2?
The Tar Cannon is used to fight wildfires by extracting and shooting tar. It’s portable but cannot be refueled while in use, so be strategic in its deployment.
3. What’s the significance of Rainbow Valley in Death Stranding 2?
Rainbow Valley is a key location for environmental restoration. Delivering terraform equipment here helps to prevent desertification and bring the area back to life.
4. Can I use vehicles to reach Rainbow Valley?
Yes, vehicles are helpful for navigating the difficult terrain, but you’ll need to manage their condition, especially when facing harsh weather or obstacles.
5. How do I connect Rainbow Valley to the UCA network?
After delivering the equipment, use a Cupid device to link Rainbow Valley to the UCA network. This will allow further environmental monitoring and recovery efforts.
Stay Connected with Haplo Gaming Chef
Haplo Gaming Chef blends gaming guides with casual cooking streams for a truly unique viewer experience. Whether you’re here for clean, no-nonsense walkthroughs or just want to chill with some cozy cooking content between game sessions, this is the place for you. From full game unlock guides to live recipe prep and casual chats, Haplo Gaming Chef delivers content that’s both informative and enjoyable.
How to Unlock and Build the Ultimate Zipline Network in Death Stranding 2
In Death Stranding 2, zip lines are back and better than ever! These handy structures are essential for traveling the vast terrain quickly and avoiding enemies, and they’ve received some significant upgrades. Whether you're looking to unlock them or wondering how to make the most of their new features, this guide will help you become a zipline pro.
Unlocking the Zipline
To start building ziplines in Death Stranding 2, you'll first need to progress to Chapter 6, specifically Order 21. This is when you meet the Dowser. After you’ve completed her request and rescued her friend from the armed survivalists, you'll unlock the important PCC Level 2.
This is when the zipline system becomes available to you. While building a zipline at this stage isn’t mandatory for completing her request, it’s definitely worth considering. You'll soon realize how much more useful ziplines become in navigating the environment.
Building Your First Zipline
Creating a zipline is straightforward once you have the PCC Level 2. Simply go into your inventory, select the zipline option, and place it wherever you'd like. Keep in mind that you’ll need to find a spot that allows you to connect two or more points, so think strategically about where you want your network to go.
To build the zipline, just press R2, and voilà – your first zipline is ready to go. The good news? You can create a whole network of ziplines. No more tedious walking across dangerous terrain; just zip across and save time.
Connecting Ziplines for Easy Travel
One of the biggest improvements to the zipline system in Death Stranding 2 is the ability to connect multiple ziplines, creating a full travel network. You can place them in a way that lets you zip from one point to another, all while avoiding pesky enemies and BTs.
When placing your zipline, you can press L2 to start building, and by pressing Square or Triangle, you can curve the line around obstacles or create a vertical arch. This is a major upgrade from the first game, where the terrain often interfered with your zipline path.
Using the Zipline Network
Once your zipline is set up, using it is easy. Simply press the Square button to use the zipline, and press X when you want to zip to the other end. If you've connected multiple ziplines, you can continue your journey from one end to the next or choose a specific destination.
And don't worry if you accidentally hop off at the wrong spot. You can easily use the same zipline system to go back to your starting point. Just hop back on and continue your journey – it’s as simple as that.
Dismounting and Fall Damage
Be cautious, though – while ziplines offer smooth travel, jumping off at high altitudes can result in fall damage. You can jump off the zipline at any time, but make sure you’re prepared for the potential impact, especially if you’re zipping across high cliffs or mountains.
Upgrading Your Zipline
One of the coolest new features of Death Stranding 2 is the ability to upgrade your zipline system. You’ll be able to increase its speed, durability, and even customize its appearance.
Each zipline can be upgraded through three levels:
Level 1 lets you travel between two points rapidly.
Level 2 enhances the range and durability, increasing the connection range from 300 meters to 350 meters.
Level 3 further boosts durability, making your zipline network even more reliable over long distances.
With each upgrade, your travel becomes faster and more efficient, making it worth investing the time to improve your network.
Zipline Networks and Bandwidth
There is one catch, though: zip lines require 500 Cryo bandwidth to function, which can be quite a bit when you first start building your network. This means you’ll need to expand your bandwidth capacity before you can build a massive web of ziplines across the map.
To get around this limitation, you can use other players’ zipline networks, but eventually, you'll want to expand your own network for faster and more efficient travel.
Planning Your Zipline Network
Building a zipline network is more than just placing random lines across the map – you'll want to strategically plan your system for the most efficient travel. Start by finding high spots where enemies or BTs aren’t a problem. From there, place a series of ziplines connecting these high points to key locations or places of interest.
For instance, place one zipline near a mountain peak and another further down. Connect the two with an additional line to create a seamless travel system. Be patient though, as constructing and upgrading these zip lines will take some time and effort. But once you've set everything up, you'll have a robust travel system at your fingertips.
Challenges of Creating a Zipline System
It’s important to note that building a large network of ziplines can be time-consuming, especially if you're dealing with harsh terrain. Many of the zipline points will be in tough-to-reach areas, so be prepared to spend a significant amount of time mapping out where to place each zipline.
While the zipline network can eventually span across massive sections of the map, it may take some effort to figure out the best connections. With careful planning, you’ll be able to avoid unnecessary obstacles and create a functional system that’s easy to navigate.
The Zipline System Across Australia and Mexico
In theory, your zipline network could connect vast regions of the game world, including places like Australia and Mexico. This opens up a whole new way to traverse the world quickly and easily without worrying about difficult terrain or enemies blocking your path.
If you're successful in setting up a zipline network across large areas, you'll significantly reduce travel time between key locations. This means less time spent walking and more time focusing on the game's core mechanics, like deliveries and story progression.
The Final Thoughts on Zipline Networks
Once you’ve unlocked and built your first set of ziplines, you’ll quickly realize just how powerful they are in Death Stranding 2. The improvements to the system mean that building and managing your own zipline network is a fun and rewarding part of the game. Plus, it’ll make navigating the game’s expansive world a lot easier.
Remember, ziplines aren’t just for avoiding enemies or BTs – they also save time, making deliveries quicker and smoother. So, whether you're a seasoned player or a new one, getting familiar with the zipline system is key to mastering the game.
How to Upgrade Your Zipline for Maximum Efficiency
As you progress through Death Stranding 2, you'll soon realize that the basic zipline isn't enough to handle the demands of more advanced gameplay. To maximize its efficiency, you’ll need to focus on upgrading your ziplines and building out your network. These upgrades will not only increase the durability and range of your ziplines but also improve your overall travel experience.
Zipline Level Upgrades Explained
The zipline system in Death Stranding 2 offers three distinct upgrade levels, each improving the functionality of your network. Let’s take a closer look at what each level offers:
Level 1: This is the basic level of zipline functionality. It allows you to travel between two points quickly, making it an essential tool for reducing travel time across shorter distances.
Level 2: At this stage, you unlock more customization options. The range increases, allowing your zipline to stretch from 300 meters to 350 meters. Additionally, it becomes more durable, so it won’t break as easily when you’re zipping through harsh environments. You can also customize the zipline with special features, making your travel experience unique.
Level 3: The final level upgrade further boosts durability, ensuring that your ziplines stay in top condition even through constant use. At this point, your ziplines are the most reliable, offering maximum speed, range, and stability.
To unlock these upgrades, you'll need to gather materials and spend time improving your network. While it can take some time to reach the higher levels, the benefits make it well worth the effort, especially if you want to create an efficient and fast travel system.
Collecting Materials for Zipline Upgrades
One of the key challenges in upgrading your ziplines is gathering the materials required for each level. You’ll need a variety of resources, including metals, ceramics, and special components that can only be obtained through specific missions or by exploring the world. As you progress through the game, you’ll encounter more advanced materials that will be necessary for completing these upgrades.
Keep an eye out for these resources during your deliveries or missions. You’ll need them not only for ziplines but also for other structures like bridges and roads. The more efficient you are in collecting and managing your resources, the faster you’ll be able to complete your zipline network upgrades.
Maintaining and Repairing Your Zipline Network
While upgrading your ziplines is essential, maintenance is equally important. Ziplines can get damaged over time, especially with constant use or exposure to the elements. It’s crucial to keep an eye on their condition and repair them whenever necessary.
To repair a zipline, press and hold the Square button when you're near the structure. A menu will pop up with several options: upgrade, repair, or dismantle. You’ll need to select the repair option if your zipline has been damaged. However, it’s important to note that repairing one zipline in your network doesn’t automatically repair the others. Each zipline must be repaired separately, so make sure to check all connections for wear and tear.
If you’ve got a large zipline network, keeping everything in top shape will take some time and effort. However, maintaining your ziplines ensures you’ll always have a smooth travel route ready when you need it.
Expanding Your Zipline Network
Once you've got your first set of ziplines in place, you may be wondering how to expand your network. Building multiple ziplines across the map can be time-consuming, especially when navigating rough terrain, but the effort pays off in the long run.
To expand your network effectively, focus on creating a logical path that connects important locations, like outposts, cities, or mission-critical areas. You'll want to prioritize high ground for the start and end points of your ziplines, as this will give you the best range and avoid potential obstacles like rocks or uneven terrain.
Think of your zipline network as a web: the more connected it is, the more efficient it becomes. It may take a bit of trial and error to get everything connected correctly, but once you have a good foundation in place, you'll be able to zip around the world with ease.
Challenges of Building a Zipline System
While ziplines are incredibly useful, building and maintaining an entire network does come with its own set of challenges. One of the biggest hurdles is navigating through difficult terrain to find suitable spots for placing your ziplines.
In mountainous or heavily forested areas, it can be difficult to find flat ground for your ziplines, and obstacles like rocks or steep cliffs may interfere with your plans. The good news is that with the new ability to curve the zipline path, you’ll be able to work around some of these issues more easily. Still, it’s important to plan your zipline placements carefully to avoid wasted time and resources.
You’ll also need to consider the availability of resources. As mentioned earlier, you’ll need a fair amount of materials to upgrade and maintain your ziplines. Make sure to plan ahead and gather resources while completing other missions.
Using Other Players’ Zipline Networks
If you’re feeling overwhelmed by the thought of building your entire zipline network, you can always rely on other players’ networks. In Death Stranding 2, you’ll encounter other players’ ziplines while exploring the world. These networks can provide a faster, more convenient way to get around, especially if you're stuck in an area without any of your own ziplines nearby.
When you use other players’ ziplines, you won’t have to worry about the bandwidth required to maintain them, as they’re already built and functional. However, keep in mind that you may not always find the ziplines where you need them. If you're serious about creating a fast travel system, eventually, you’ll want to build your own network that fits your playstyle.
Strategies for Efficient Zipline Travel
To get the most out of your ziplines, it's important to have a strategy for building and using them. Consider these tips for making your zipline network more efficient:
Start at High Points: When building ziplines, try to place the starting point on high ground. This not only improves your range but also reduces the risk of encountering obstacles on the ground level.
Think About Connection Points: Your network should connect key locations. Place ziplines near cities, delivery points, and mission locations to minimize detours.
Use Curves Wisely: Curving your ziplines around obstacles will allow you to avoid challenging terrain. Use this feature to your advantage to create smooth, uninterrupted paths.
Upgrade Often: Keep upgrading your ziplines as you progress. The more durable and longer-range ziplines you have, the more efficient your network will be.
By thinking ahead and using these strategies, you’ll be able to create a zipline network that greatly enhances your gameplay experience.
Maximizing Zipline Efficiency Across the Map
As you continue to expand your zipline network, you'll quickly see that the more connected your ziplines are, the more efficient your travel becomes. The vast open world of Death Stranding 2 can feel overwhelming, but ziplines act as an essential tool to cut down on travel time, making it easier to get from point A to point B without dealing with the world’s harsh environments.
Strategic Zipline Placement for Smooth Travel
When it comes to planning where to place your ziplines, you need to think strategically. Not all locations are suitable for easy connections, and placing a zipline in the wrong spot could mean a lot of wasted time and effort later on.
Look for High Ground: The best place to set up your ziplines is on high ground. This allows for greater range and helps avoid obstacles like mountains, cliffs, and rocks that might block your path. Starting at a high point also ensures you get a smoother descent, which will help you zip from one point to another without hitting any barriers.
Avoid Enemy and BT Areas: When setting up your zipline network, it’s important to avoid placing ziplines near areas swarming with enemies or BTs. Not only will this slow you down, but you’ll risk your zipline getting damaged or destroyed. Opt for quieter, less hazardous spots to set up your lines.
Plan for Multiple Stops: Your zipline system should be more than just a couple of lines running in a straight path. Think about multiple connection points along your journey. The more ziplines you have connected, the faster your travel will be, so be sure to plan your network in a way that connects multiple key locations.
Dealing with Harsh Terrain and Obstacles
Building a comprehensive zipline network is not without its challenges. Harsh terrain, like steep cliffs, mountains, and uneven ground, can block your path. However, the ability to curve your zipline offers a solution.
Curving Your Ziplines: One of the best new features in Death Stranding 2 is the ability to curve the zipline path. By holding L2 and pressing Square or Triangle, you can adjust the direction of your zipline, curving it around obstacles or even making it go upward. This allows you to bypass problematic areas, like rocks, cliffs, or dense forests, and creates a more direct path for faster travel.
Curving the zipline might take some practice, especially in areas with tight spaces, but once you get the hang of it, you’ll be able to place your ziplines with ease and avoid a lot of frustration.
Building Zipline Systems to Access Remote Locations
As you explore Death Stranding 2, you'll come across remote locations that are difficult to access. Ziplines can be a huge help in these areas, providing a faster way to transport yourself to otherwise unreachable spots. The game world can often be punishing with its steep inclines, muddy paths, and dense forests. Ziplines give you a way to bypass these obstacles without risking your health or stamina.
Placing Ziplines in Remote Areas: When setting up ziplines in these tough-to-reach places, try to connect them to other nearby locations that are more accessible. This way, you’ll have a network of ziplines that connects you to the most important spots across the world, making long journeys significantly shorter.
Use Ziplines to Explore New Regions: If you’re trying to unlock new areas or explore parts of the map that are far from your current location, ziplines are the perfect way to get there quickly. Place a zipline in a high point near the edge of the map, and you can zip to a completely new region with little effort.
How to Make the Most of Other Players’ Zipline Networks
One of the great features of Death Stranding 2 is the shared world system, where players’ actions and creations can affect others. Ziplines are no exception, and you’ll often find other players’ ziplines scattered across the map. These can be incredibly useful when you’re trying to move quickly between areas or cut down on travel time.
Using Community Ziplines: If you’re not keen on building your own network right away, or if you’re just passing through a difficult area, you can take advantage of other players’ ziplines. These networks are typically built by other porters to make travel easier, so don't hesitate to jump on one when you see it.
While you can use other players’ ziplines, remember that these are not permanent solutions. You’ll eventually want to create your own network to have a complete and customized travel system, tailored specifically to your needs.
The Importance of Zipline Repair and Maintenance
Once your ziplines are in place, they won’t stay in perfect condition forever. Constant use, weather conditions, and the occasional enemy attack can damage your ziplines. It’s essential to keep your network in working order to ensure smooth and uninterrupted travel.
Repairing Your Ziplines: To repair your ziplines, simply press and hold the Square button when near one of your structures. A menu will pop up where you can choose to upgrade, repair, or dismantle the zipline. However, repairing one zipline does not fix others in your network, so be sure to check each one individually.
While repairing ziplines might feel like a chore, it’s necessary to keep your network running at peak performance. If you let your ziplines fall into disrepair, you’ll find yourself with a network that’s more trouble than it’s worth.
Expanding Your Zipline Network for Future Travel
Expanding your zipline network is not just about connecting a few points. Over time, you’ll want to build a more complex system that allows you to traverse the entire world efficiently. The goal is to create a system that connects your most visited locations, making the game world feel much smaller and easier to navigate.
Connecting Key Locations: Your zipline network should be built around the places you visit most. Outposts, cities, and delivery points are perfect candidates for zipline connections. By focusing on these locations, you’ll ensure that your network serves you well and helps you get around quickly.
Plan for the Long Haul: As you progress in Death Stranding 2, your zipline network will become even more important. The further you get into the game, the more complex the terrain and objectives become. The more connected your zipline system is, the easier it will be to tackle long-distance deliveries and missions.
Maximizing Zipline Usage During Complex Deliveries
While ziplines are already a major time-saver, their true potential shines when you're tasked with complex deliveries. Whether you're carrying a heavy load or attempting a difficult mission, a well-constructed zipline network will allow you to focus on your objectives instead of worrying about long and treacherous journeys.
Efficiently Transporting Cargo with Ziplines: The key to using ziplines during deliveries is planning. Ziplines can be used to bypass hazardous terrain, such as rivers, cliffs, and mountains. However, keep in mind that transporting large or fragile cargo through ziplines may require additional consideration. You may need to plan for multiple ziplines to handle the load or find ways to minimize the impact on the cargo's condition.
To make deliveries more efficient, set up your network so that ziplines connect directly to delivery points or close to the mission objectives. This saves time and reduces the need for unnecessary traversal on foot.
Minimizing Damage to Cargo: Zipping across great distances means you may encounter high drops or obstacles that could damage your cargo. If you’re traveling long distances with a heavy load, it’s wise to test your routes with less important deliveries first. This allows you to gauge the safety of each segment of your zipline network.
Handling Zipline Failures and System Interruptions
No system is flawless, and Death Stranding 2 is no exception. While ziplines provide incredible convenience, they can still fail for a variety of reasons, including environmental factors, player interference, or system errors. If one of your ziplines breaks or stops functioning, you’ll need to know how to quickly address the problem.
Common Causes of Zipline Failures:
Weather Conditions: Harsh weather conditions, such as heavy rain or strong winds, can cause your zipline to malfunction. In these conditions, you might have to wait until the weather clears or make a quick repair if the damage is minimal.
Damage from Enemies or BTs: Occasionally, enemies or BTs can disrupt your zipline network, damaging parts of the structure. Be on the lookout for enemy territory when constructing your ziplines, and keep in mind that not all ziplines are immune to these hazards.
Addressing Zipline Failures: If one of your ziplines breaks, you’ll need to fix it manually by holding Square to access the repair options. If you're dealing with a wider network, it’s advisable to check the health of each line regularly to avoid larger disruptions later on.
Balancing Zipline and Other Transport Methods
While ziplines are great for quick travel across the map, they’re not the only transport method available in Death Stranding 2. Balancing your use of ziplines with other mobility options can make navigating the terrain even more effective.
Using Vehicles and Exoskeletons: In areas where the terrain is too rugged for easy zipline placement or where ziplines are too far apart, vehicles and exoskeletons can be invaluable. Vehicles help you transport cargo across long distances, and exoskeletons enhance your stamina and carrying capacity. Using a combination of these tools along with your ziplines will make your travel system even more versatile.
Creating Efficient Routes with Ziplines and Other Transport: Consider the balance between using ziplines and other transportation methods. For example, if you need to cross a wide river, you might use a vehicle to get to the zipline start point, then use the zipline for the final stretch to avoid unnecessary backtracking.
Troubleshooting Common Zipline Issues
Though the zipline system in Death Stranding 2 is highly effective, you may occasionally encounter problems that can hinder its performance. Here are a few common zipline issues and how to address them:
1. Ziplines Are Too Close Together: If you’ve placed multiple ziplines too close to one another, they might overlap, causing travel difficulties. To fix this, adjust the placement of your ziplines, ensuring each one has adequate space for smooth travel.
2. Ziplines Are Blocked by Terrain: Sometimes, ziplines may get blocked by obstacles like rocks, trees, or cliffs. If you encounter this problem, you can use the curving feature of ziplines to bypass these obstacles or find higher ground to place the next zipline point.
3. Connectivity Issues: If you’ve created a system of ziplines but find that you can’t zip to certain locations, check your network’s connectivity. Make sure the lines are properly placed and that no part of your network is disrupted or damaged. You may need to adjust the placement of certain ziplines or repair broken ones to restore full connectivity.
4. Difficulty Reaching the Zipline Start Point: If your zipline network is spread over vast distances or rugged terrain, you may find it difficult to reach certain zipline starting points. Consider placing additional ziplines in areas that are easier to access and connect them to the main network for smoother transitions.
The Role of Ziplines in Story Progression
In Death Stranding 2, ziplines are not just tools for fast travel—they also play a role in progressing through the story. The ability to connect distant locations and facilitate the delivery of critical items is integral to advancing through various chapters. As you progress, you'll be able to create a more advanced zipline network that not only helps you but also supports other players in the game.
How Ziplines Impact Story Missions: As you complete main and side missions, you’ll unlock more advanced equipment, including higher-level ziplines. Some story missions will require you to use ziplines to reach remote locations, while others might introduce new challenges that require smart use of your network.
Be sure to incorporate ziplines as part of your strategy when tackling difficult story-based objectives, as they can help you navigate hazardous areas with ease and minimize the time spent on travel.
Making Zipline Networks a Community Effort
One of the most unique aspects of Death Stranding 2 is its emphasis on community-driven gameplay. Ziplines are a perfect example of this, as you can help other players by building a network that others can benefit from. In fact, the game rewards you for creating and maintaining a useful infrastructure that enhances the experience for everyone.
Helping Other Players with Your Zipline Network: As you build your own zipline system, keep in mind that other players may also be traveling through the same areas. Share your creations by making your zipline network as accessible and efficient as possible. By doing this, you’ll not only help other players but also receive rewards for your contributions to the community.
Leave Helpful Hints and Mark Important Locations: When placing ziplines, leave markers or other helpful signs to assist players who might not be familiar with the area. This is a great way to encourage teamwork and make the world feel more interconnected.
Conclusion: Zipline Mastery for Efficient Travel
Mastering the zipline system in Death Stranding 2 can significantly reduce your travel time and enhance your ability to tackle difficult missions. By carefully planning your zipline network, upgrading your ziplines to their highest levels, and making use of other players’ networks, you’ll be able to traverse the vast world quickly and efficiently.
Remember that the key to success with ziplines is balance—use them in conjunction with other transport methods, maintain your network regularly, and always plan ahead for potential challenges. With these strategies, you’ll be able to zip across the map with ease, saving time and effort for more important tasks.
FAQ for Ziplines in Death Stranding 2
Q1: How do I unlock the zipline in Death Stranding 2?
A1: You unlock the zipline in Chapter 6, after completing the Dowser's request and rescuing her friend from the armed survivalists. You’ll also get the PCC Level 2.
Q2: Can I connect multiple ziplines?
A2: Yes, you can create a whole system by connecting multiple ziplines. This helps you travel long distances quickly and avoid enemies.
Q3: How do I curve a zipline in Death Stranding 2?
A3: While building a zipline, press Square or Triangle while holding L2 to curve the zipline around obstacles or make it go upwards.
Q4: How do I repair or upgrade a zipline?
A4: To repair or upgrade a zipline, hold Square near the structure and choose the repair or upgrade option from the menu.
Q5: Are there any limitations on using ziplines?
A5: Ziplines require 500 Cyro Bandwidth to function, so you’ll need to expand your bandwidth before creating a large network.
Q6: Can I use other players' ziplines?
A6: Yes, you can use ziplines created by other players to save time when traveling through their networks, though you'll eventually want your own system.
Q7: What happens if I fall off a zipline?
A7: If you fall from a zipline, you can take damage depending on how high you are. You can jump off at any time, but be careful of fall damage.
Q8: How do I create the best zipline network?
A8: For an efficient network, place ziplines on high ground, avoid enemy zones, and ensure smooth connections between key locations.
Stay Connected with Haplo Gaming Chef
Haplo Gaming Chef blends gaming guides with casual cooking streams for a truly unique viewer experience. Whether you’re here for clean, no-nonsense walkthroughs or just want to chill with some cozy cooking content between game sessions, this is the place for you. From full game unlock guides to live recipe prep and casual chats, Haplo Gaming Chef delivers content that’s both informative and enjoyable.