
Understanding the Bellanoir Libero Build for Hard Mode
Taking on Bjorn and Bastigor in Hard Mode is no easy feat, but with the right Bellanoir Libero build, you can turn the tide. This guide covers how to maximize damage output while managing survivability—without relying on the Vampiric skill. Whether you're testing Rock Burst or leaning into Nightmare Bloom, this breakdown helps you stay competitive and survive those punishing boss attacks.
Instead of the usual Vampiric build, we’re focusing on a Ferocious Bellanoir Libero setup. It's all about pushing raw attack power higher while giving up the self-healing that Vampiric normally provides. This forces more strategic play—positioning, aggro management, and a deeper understanding of your pal’s role during boss fights.
Choosing Ferocious Over Vampiric: A Trade-Off for More Power
Running Bellanoir Libero with Ferocious instead of Vampiric means shifting from sustainability to offense. Normally, Vampiric adds substantial healing by converting damage into health, especially when the player and pal are actively attacking. In tower boss fights, that added healing—up to around 17,000 HP—is critical for reducing the need to dodge or micromanage health items.
But in this approach, without Vampiric, the healing buffer is gone. Instead, you'll rely on manual healing with potions and smarter positioning. Ferocious gives Libero a more aggressive edge, ideal if you're confident with your dodging skills and want faster boss clears. It also means you need to play a more active role in holding aggro and managing damage.
Managing Aggro Without Vampiric: Your Role as a Player
When your Libero isn't absorbing hits for you, holding aggro becomes your job. If Libero deals too much damage too fast, bosses like Bjorn may shift focus to her. That’s why, at the start of the fight, it's crucial to immediately open with strong ranged attacks—like missiles or rockets—to establish dominance and keep the boss fixated on you.
This approach limits how much danger your Libero is exposed to. Skills like Rock Burst or Air Blade are powerful, but they bring Libero too close to bosses who have dangerous area-of-effect moves. To balance this, you’ll need to constantly monitor her position and adjust where you stand to keep her safe but still effective.
Combat Positioning: Keeping Libero Safe Without Losing DPS
Without Vampiric, Libero's survival hinges on your awareness. One wrong placement and she’ll take splash or AoE damage from Bjorn’s attacks like Hydro Lasers or Glacial Impact. The key is keeping her positioned between you and the boss, so the enemy is more likely to target you instead.
This also opens up opportunities for indirect damage, where bosses run into Libero’s Rock Burst or Air Blade effects while chasing you. However, mispositioning can lead to her getting clipped by multi-hit skills or environmental hazards. Using a healing potion early and strategically can help offset any accidental hits, giving Libero a better shot at staying in the fight longer.

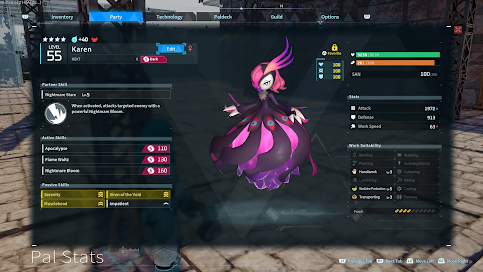
Skill Combo Strategy: Rock Burst, Air Blade & Flame Funnel
For players choosing the Rock Burst build, execution matters more than gear. This combo—Rock Burst, Air Blade, and Flame Funnel—has a high DPS ceiling but requires good timing and spacing. You’ll want Libero close enough to land Rock Burst consistently, but not so close that she gets hit with every boss skill.
At the same time, you're balancing your own damage to maintain aggro. If Libero deals more damage too fast, she’ll draw unwanted attention. That’s why using high-damage opening attacks—before Libero fully ramps up—helps you stay in control. While this playstyle is more hands-on, it rewards tight coordination with faster boss takedowns when executed well.
Rock Burst Build vs. Nightmare Bloom Build: Two Strong Paths
While the Rock Burst + Air Blade combo is all about high impact and quick bursts of damage, it demands precise timing and close-range positioning. In contrast, the Nightmare Bloom build offers a more relaxed playstyle with a wider attack range and less need for micromanaging Libero’s location.
Nightmare Bloom’s strength lies in its exclusive synergy with Libero, allowing her to teleport and cast powerful damage-dealing attacks from a distance. This not only keeps her safer from AoE damage but also reduces your need to manually dodge or reposition constantly. It’s an easier build to execute, especially for players who prefer a long-range strategy.
Best Skills for Nightmare Bloom Libero Build
For the Nightmare Bloom build, Thunderstorm and Flame Funnel round out a solid trio. Nightmare Bloom opens the fight with heavy damage, followed by Flame Funnel’s consistent pressure. While Wall Splash is a strong choice on paper, it interacts poorly with Flame Funnel by reducing its damage when enemies are soaked—so it's best avoided in this combo.
This build capitalizes on Libero’s ability to deal heavy ranged damage early in the fight. However, be aware that if you aren't doing enough damage as a player, you might lose aggro, making it harder to control the flow of battle. Still, it’s a powerful setup, especially in encounters where repositioning is tough or you want to reduce the risk of Libero taking damage.
Legendary Gear and Player Contribution: Why It Matters
Your effectiveness in either build depends heavily on your player damage output and gear quality. With legendary weapons, your character can maintain aggro longer and give Libero the space she needs to operate safely. If you're undergeared, though, Libero might accidentally pull aggro—especially in Rock Burst builds—leading to chaotic, damage-heavy exchanges.
This is one reason Vampiric builds are often recommended for newer or under-equipped players. But if you're in the late game and armed with maxed-out gear, you can afford to take more control of the fight. This lets you move away from passive healing and toward builds that maximize raw DPS and shorten the encounter.
Boss Behavior: Understanding Bjorn and Bastigor Patterns
Both Bjorn and Bastigor have patterns that punish poor positioning. Bjorn’s Hydro Lasers and Glacial Impact hit wide areas, and Bastigor uses aggressive jumps and close-range swipes. These moves can easily clip Libero if she’s too close, particularly in Rock Burst setups.
That’s why reactive dodging and preemptive placement are critical. You’ll need to anticipate attack windows, reposition Libero between casts, and manage both your damage and healing windows. Nightmare Bloom builds sidestep a lot of this by letting Libero act from a distance, but the Rock Burst combo demands sharp awareness to avoid setbacks.
Performance Comparison: Execution vs. Simplicity
Choosing the best Bellanoir Libero build depends on your priorities—raw damage or ease of execution. The Rock Burst build, when used correctly, can deal massive DPS, often outperforming other setups in speed. However, it comes with high risk: missteps mean more healing, dodging, or even restarts due to Libero’s early KO.
In contrast, the Nightmare Bloom build is more forgiving. It’s simpler to maintain, less prone to error, and keeps Libero safer throughout the fight. While it may not top the DPS charts against Bjorn and Bastigor, its reliability makes it a strong contender, especially when combined with legendary gear.
When to Choose Each Build
Use the Rock Burst build if:
-
You have strong gear and high personal damage output
-
You’re confident in micromanaging aggro and positioning
-
You want the fastest boss clears possible
Go with the Nightmare Bloom setup if:
-
You want a safer, long-range strategy
-
You prefer passive positioning with less micromanagement
-
You’re running bosses with unpredictable movement or large AoEs
Each build has a place depending on your team composition, playstyle, and boss mechanics. It’s not just about what’s “best”—it’s about what works best for you.
Final Thoughts: Choosing the Right Bellanoir Libero Build
Taking down Bjorn and Bastigor on Hard Mode in Palworld requires more than raw strength—you need a strategy tailored to your setup. Whether you choose the high-risk, high-reward Rock Burst + Air Blade combo or the safer, ranged Nightmare Bloom build, the key is aligning your playstyle with Libero’s strengths.
Without Vampiric, Ferocious gives you a clear offensive edge, but demands better aggro management, positioning, and personal DPS. Nightmare Bloom builds ease that pressure, giving you more room to focus on survival and long-range impact. No matter which path you pick, understanding boss mechanics, staying aware of aggro, and optimizing gear will determine your success.
Frequently Asked Questions (FAQ)
Q: Is Vampiric still worth using on Bellanoir Libero?
A: Yes, especially for newer players or those with less powerful gear. It adds a major survivability layer by healing Libero as she deals damage. However, advanced players can drop it for Ferocious to increase raw DPS.
Q: Which build is easier to manage—Rock Burst or Nightmare Bloom?
A: Nightmare Bloom is easier. It allows Libero to attack from a distance, reducing risk and micromanagement. Rock Burst requires closer range and tighter positioning, but offers higher DPS.
Q: Can I run Rock Burst without legendary gear?
A: Technically yes, but it’s harder. Without strong gear, your character might not maintain aggro effectively, causing Libero to draw unwanted attention and take more damage.
Q: Why does Flame Funnel not work well with Wall Splash?
A: Wall Splash soaks the enemy, which reduces the damage output of Flame Funnel. If you're using Flame Funnel, it's better to skip Wall Splash to maintain DPS.
Q: What’s the main difference between builds with and without Vampiric?
A: Vampiric builds focus on self-sustain and tanking longer fights. Builds without Vampiric rely more on positioning, player DPS, and healing items but can finish fights faster with higher output.
🎮 Meet Haplo Gaming Chef 🍳
Level 99 Kitchen Warrior here! I'm on a quest to transform your gaming sessions into epic culinary adventures. When I'm not farming rare ingredients in MMOs, I'm crafting real-world recipes inspired by your favorite video games.
Specializing in: • Game-inspired recipe creation • Cooking quest guides • Power-up snacks for gaming sessions • Achievement-worthy meal prep
Join my party as we explore the delicious intersection of pixels and plates. Whether you're a casual foodie or a hardcore gamer, there's always room at my crafting table! #Gaming #GamingGuides #GamingChef #HaploGamingChef For More Visit: https://haplogamingchef.blogspot.com/
Follow Me!
https://bsky.app/profile/haplogamingchef.bsky.social
https://www.threads.com/@haplogamingchef
https://www.twitch.tv/haplogamingchef
https://www.pinterest.com/haplogamingchef
https://www.youtube.com/@HaploGamingChef
https://www.tiktok.com/@haplogamingchef
https://flipboard.com/@HaploGamingChef
https://x.com/HaploGamingChef
https://www.instagram.com/haplogamingchef
https://www.facebook.com/HaploGamingChef
https://www.linkedin.com/in/haplogamingchef
https://haplogamingchef.blogspot.com
https://www.tumblr.com/haplogamingchef
https://medium.com/@haplogamingchef
Google Business Profile: https://g.co/kgs/6nqgw9H


No comments:
Post a Comment